Sunday, November 6, 2011

Nov Sketchy Challenge

The November Sketchy challenge is up over at Canadian Scrapbooker . All entries containing at least one Canadian supplier while be eligible  for possible publication in an upcoming issue of Canadian Scrapbooker magazine.  Go give it a try. Here's this month's sketch:
...and here's my take on this month's sketch...


Yes...yet another graduation LO.  The little journaling spot is an idea I lifted from Gabrielle Pollacco on her recent 'Bliss" LO. You can check out her gorgeous work HERE .
     The postage stamp edging was inspired by a recent posting by my dear friend Kelly , where she showed a tutorial on how she achieved this edge with a round punch. I think my edges are alot bigger ...wrong size punch I guess LOL. But it's a great idea  and I actually used the half circle punched out pieces elsewhere on my LO. Can you find them?
 I simply inked the edges and then tucked them under my circle edge.Another whole" layer" without all the bulk.
One of my Canadian products on this LO is the cork stickers from Magenta...

 I really loved the look of them  but found them fairly difficult to work with as they tore very easily being so delicate. After just a little cussing and swearing, I figured it out. I made several cuts with my craft knife { like at the base of a bunch of leaves} and took the stickers off in several pieces , lining up the edges again as I laid them on my paper. It was much easier [ and a helluva lot less frustrating!} to line up the cut edges as compared to the torn edges! 
Here's one more close up:

So what are you waiting for? head on over to Canadian Scrapbooker and try your hand at this month's sketch! thanks for popping by! Toodles!

Monday, October 31, 2011

A Study in White { and love}

WHITE doesn't seem to be the right colour to be talking about on Halloween but it's all around me today!Check out what greeted me this morning when I arose!


Hardly seems appropriate for today! But thankfully we only got 11 cms of the stuff so we fared a lot better than many along the eastern seaboard!
But what I really wanted to share with you today is an all white LO that I did last night. Everything ,except for the white vellum butterflies and the Dusty Attic hinge [ painted white of course!}, was created from plain white cardstock. 
Earlier this summer, I stumbled across a fantastic paper artist by the name of Jeff Nishinaka. His work is phenomenal and you can check it out here. He works on quite a large scale using only white paper. Another artist I heard about just today is Elsa Mora. She also creates amazing work with mainly white paper and an exacto knife....except she does it on a much smaller scale! You can find her lovely work here.

Here's my work in white....


and here's a few close ups....


I absolutely love making my own flowers! I 'm amazed at how much plain old paper can be manipulated into various shapes.  I've added a simple tutorial to show you how I made the two main flowers in this LO.

Here's what you'll need :

white cardstock
embossing folders of choice{I used Textile  and Swiss dot}
retro flower punches small and medium size
2" and 1.5" round punches
Stickles { Star Dust}
Fabric tac { or glue of choice}
bamboo skewer/paint brush handle
leaf stamp
watermark ink and clear emboss powder
self adhesive pearls

For the sake of brevity, I've already stamped and embossed my leaf pattern onto cs, and also ran a few pieces through my Cuttlebug inTextile and Swiss Dot. I'm going to try and give directions for the two different size flowers a the same time....hope I don't confuse you!
Punch two med retro flowers and one small retro flower from the swiss dot cs.
Punch a 2"circle and one 1.5" circle from the textile cs. On the BACK of the punched circles , lightly draw five lines as shown. these will be your cut lines. Don't fret about being too perfect...it really doesn't need to be!

As you can see from the above photo, I've already cut out my stamped leaf and using the bamboo stick , have rounded and curled the leaves.
                                                                              
I tend to "cut off' the corners of the petals of the larger flower and sometimes take little snips along the top edges of the individual petals. Using the bamboo stick, I gentle curl the petals around it to "shape" my flower. The 2" circle above shows the layer that has been curled  and the 1.5" hasn't been shaped yet.
On the smaller swiss dot flower, I curl the petals downward on the bottom layer and upwards on the middle layer { both punched with the medium retro punch]. I usually just use the flat end of the bamboo stick to press in the center of the smallest retro flower as I cup it in my hand. Some people spritz their pieces with water before shaping...I didn't on these as I felt they curled just fine without it. However I do recommend it for really thick  papers. Of course you will need to air dry or use a heat gun on these layers if you choose to spritz.
Next , glue your layers together, making sure to stagger your petals. Finish with a pearl in the center of each flower. Paint tips of flowers with Stickles if desired...then assemble your leaves and flowers in an arrangement that is pleasing to you.


Just a couple more quick comments about my white Lo. The title was cut with "Storybook" cart on my Cricut. I wanted it to have dimension too, so I cut the words five times and then glued each layer together before painting it with a layer of Star Dust Stickles for a bit of pretty shimmer. This photo of me and DH was taken two weeks ago...it has nothing to do with weddings, or Valentine's day etc{ altho this WOULD make a gorgeous wedding Lo wouldn't it?} It was just a fav pic of the two of us and I wanted a mushy LO of me and my DH...still love him soooooo much after 23 years together! 
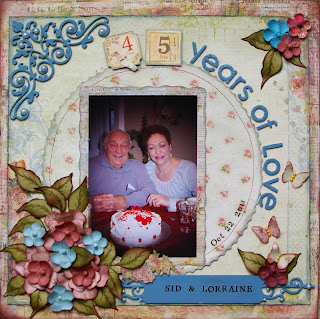
And speaking of long term love...I'll finish this post with a LO of my mom and Dad  who celebrated their 45th wedding anniversary last weekend while visiting us here in Corner Brook.


Thanks Mom and Dad  for setting such a wonderful example! Love you!
Thanks for stopping by. Have a great week...Toodles!

Monday, October 17, 2011

My Fab Trip and Oct Sketchy Challenge

             Canadian Scrapbooker has its October Sketchy Challenge up on its site. Check it out!

And here's my take on it! I obviously rotated the sketch but all's fair in love and war right? LOL


I chose to add my journaling around the edge of the page to help keep that "uncluttered" look. Now hurry on over to Canadian Scrapbooker  and give it a go. All LOs will be put in their online gallery but only LOs using at least one piece of Canadian product will be eligible for a possible publish in an upcoming issue of CS magazine!
                                                                  
 Well, as some of you may know, I recently came back from a trip to Edmonton to visit my dear sweet friend Kelly, who I originally met on scrapbook.com almost 2 years ago. OMG! From the minute I stepped off the plane I felt like I was with a friend I've known my whole life! I wish I'd had my camera handy {  I didn't! GASP!} to show you the cute sign she had written on  the backboard from a Martha Stewart score board ...it was a heart with the words nfldmichelle { My scrapbook.com name} ...yah right ...as if I wouldn't have recognized her! She was the hostess with the mostest! A beautiful home, a beautiful family and lots of yummy food! {Don't forget to email all those recipes that I forgot to take with me ...DUH!}. One of the BIG treats of the week was spending two full days at Canadian Scrapbooker's Scrap Carnival in Edmonton! What a BLAST!!!! From the awesome classes, to the fun contests and everything in between...those CS girls sure know how to have fun! Thanks Jackie and Katrina for calling me up to the front and giving me a little prezzie for having come from so far away!    

                             Here's a snap of Kelly and I with the CS girls...


and another of Kelly and I at our scraptable...


       One of the fun events at the carnival was a "Phototbooth' complete with silly props set up by Allison Orthner {who's Lights! Camera! Action! class was a lot of fun and very informative BTW!}
   Kelly and I were first in line to ham it up  and here's the LO to prove it! I used My Little ShoeBox "Audrey' line pps for this one and my new Tim Holtz Tattered Flowers die.. I was so excited to discover I could use it in my little ole Cuttlebug!

                                                                                  
and here's a close up of my first Timmie flower ....Thanks for the G45 brads that I used for the flower centers Kelly!

                                                                              
anyhoooo...that's it for tonight. I just want to say a GREAT BIG THANK YOU  to dear Kelly for such a fabulous week. It makes me sad to think that we are now thousands of miles apart again . Sure wish she was just next door. Thank God for the Internet. Toodles!

Wednesday, September 7, 2011

Time Lines and a Sketchy challenge

Happy beautiful fall day !It was so nice here today { after torrential rains and wind yesterday! 100 mm of rain!!!}. It was a great day for a walk in Margaret Bowater Park with hubby who decided to take the day off with me!  I actually took some really nice pics in the park the other day and hope to get them scrapped real soon. Here's a sneak peak of the beauty that I get to walk through every day! 

 Today , though, I thought I'd share a couple of LOs with you involving time lines.  The first first Lo is of Chelsea on her very first and very last day of school! Where the heck did thirteen years go? I used the Bo Bunny line "Timepiece" for this plus some yummy Dusty Attic chippie pieces...specifically the skeleton clock face and the pocket watch. These pps were from my ScrapThat kit from a few months ago.

TIME FLIES

 I really liked the sheet of corrugated kraft paper that was included in the kit. I used it for my title and then backed it with some red card stock that I cut on an angle to give it a more shadowed 3D feeling.


Here's a few more close ups. The Dusty Attic pocket watch was painted with acrylic paint , gold bits are Perfect pearls gold and I added several layers of Stampin' Up crackle emboss to age the "glass' face.

 My other "timeline ' LO looks at time from a different perspective....Scott's perspective ! LOL.
So naturally that has to do with wheels! This is actually my submission for a new monthly contest going on over at Canadian Scrapbooker called "Sketchy Challenge". This month's sketch is by the talented Jill Sarginson from Ottawa, Ontario.  She designs for a lot of sketch sites. You can check out her blog here.


Here's the sketch

and here's my take on it!

THE [R]EVOLUTION OF A GUY'S WHEELS


I'm sure it was only last year that he was burning around the kitchen on his Little Tykes scooter!!!! and now he's a car owner!!!! { notice I said owner NOT driver! LOL} He bought a "fixer upper" ..."It's a project car for me and Dad to work on " he said. He doesn't even have his licence yet!  I suspect it will make a lovely snow block in the driveway come winter. Thanks for dropping by and now go check out that sketch challenge. You may get published ! Woohoo!

Tuesday, August 16, 2011

Are 2 pages Better Than One?

How long have you been scrapping? One year ? ten plus years? I'm always amazed by how much some things change in the scrappy world. I , myself, have been scrapping "in the modern form" LOL for about 10 years now. { like alot of you I've been saving scraps and gluing them in the old fashioned scrapbooks ALOT longer!}. One thing I've noticed over the last few years is the tendency to scrap only one pagers. When I started years ago , I did double LOs 99% of the time { and in 8 1/2 x 11 format too! Gasp!}. My first 400 pages were 8 1/2 x 11 mostly double pages...yup ! I said 400!!!!  Both my kids have birth to kindergarten books with 200 pages a piece ! Needless to say they were MUCH simpler than some of the stuff I do now! { Do you ever go back and look at your beginner stuff for a laugh?}. Somewhere along the way { probably when I joined scrapbook.com } I started my shift toward one page "masterpieces" LOL.  I couldn't seem to blend the "fancier' style I was now enjoying with the size of a two page spread. But sometimes a one pager is just not enough room! Right? So I've been experimenting with two pagers again lately in hopes of getting through the massive pile of  graduation photos I took of Chelsea! While I still prefer the one pagers , I'm pretty pleased with how these two Los turned out!


This one features some GORGEOUS Dusty Attic pieces...the wrought iron like edgings, the leaves and the flowers which were soaked apart into three layers, inked with Distress ink, highlighted with abit of gold Perfect Pearls powder and then dried and re glued in a more "crumpled' version of the original. These were done following a great tutorial by Mistra over at http://www.dustyattic.ning.com/ . Here's a close up of mine!


I've been on a real Dusty Attic kick again lately. Seems like most of my Los lately have at least one piece on them! I've decided to stop hoarding all those gorgeous pieces and just start enjoying them on my LOs .There's no point admiring them in a box and not sharing them with everyone else is it?

My second 2 pager Lo was created using the gorgeous new Prima pps ... the Alla Collection sent to me by my sweet friend Kelly  ,who thought they'd be just right for some of my grad photos...and boy! was she right! I really enjoyed playing with these over the last few days. The colours are so fresh and spring like! I used a total mish mash of flowers on this LO! Some Prima tea roses, beige flowers from Dollarama  and some handmade ones using one of the other lovely patterns in the Alla collection. I had these cute little K and Company fabric brads pinned on my board for ages...and was tickled pink that they matched so well for my flower centers.


 The banner was also handmade using very basic supplies! I cut the beige CS into a 1"x 12" strip with my trimmer ,then drew a center line down the 12'length on the WRONG side of the strip. I then cut the strip into 1 1/2 " lengths and using a pair of fine tipped scissors  cut 'V' notches in each piece{ that's what the center line was for on the back of the strip!}. Next I glued the beige pieces onto teal CS, and eyeballing it trimmed the teal CS. I used a brown sharpie pen to add "stitching" to each piece. I glued down my banner pieces after playing with their positioning, added the Sticko letter stickers and then punched a line along the top of the banner to add the floss stitches. Easypeasy! Here's just the rt side of the Lo so you can see the banner a little better!


 Well that's it for tonight! Drop me a line and let me know what you prefer..one pagers or two and why! Enquiring minds want to know ! LOL Thanks for stopping by! Toodles!

Thursday, August 11, 2011

Full reveal at Berry71bleu!

Ok ...so I'm a day late [ and a dollar short as the old saying goes LOL} Yesterday was reveal day over at Marivic's place, Berry71Bleu . I feel so honored to be chosen for her August guest DT! It was a pleasure to work/design with Marivic's gorgeous one of a kind tags!


This is Chelsea with her friend Josh. He was a fun guy to take to grad  and a great sport!


 This is my other Lo using one of Marivic's beautiful tags.  This is Chelsea and her friend Ivy , and yes, they ARE wearing the same graduation dress! When we found this dress on a trip home to Grand Falls, Chelsea immediately fell in love with it! then she realized that it was probably the same dress her friend , Ivy already had! Thank goodness for cellphones with the internet LOL. Chelsea went to her school's Facebook grad dress page and realized , GULP! yup , it was the same dress. Oh dear ...now what? Chelsea texted Ivy and explained the predicament [ and the fact that it was a different colour] and thankfully, good friend that Ivy is , she was totally cool with it! So of course we had to have a pic of them together ! Chelsea, the grammer police , had a fit when she saw that I had spelled twins with a "z' instead of a "s'. too bad I say....I ran out of s's! LOL . Please pop on over to Marivic's BLOG and see the gorgeous projects my fellow Guest DT members, Iris Babae Uy of the Phillipines and Cynthia Renaud of Brazil  have created.
 Marivic also has a recipe challenge going on this month with a gorgeous prize . I'll post my take on the challenge tomorrow!
Be sure to check out Marivic's beautiful tags for sale at her Etsy shop . You won't be disappointed.


Tuesday, July 19, 2011

Sneek Peek!!!!


I'm honoured to have been asked to be on the August guest DT by Marivic over at berry71bleu. She creates beautiful tags ..just the perfect finishing touch for your LOs. She has a lovely vintage, shabby chic style. Check her stuff out at her etsy shop www.etsy.com/shop/berry71bleu . This pic is from one of Chelsea's graduation Los. You can see the edge of one of Marivic's beautiful tags to the side of the purple dress. Pretty eh? That's it for tonight ...thanks for popping by. BTW....I seem to have misplaced my mojo...anyone seen it???Please send it back to Corner Brook....I still have a zillion grad photos to scrap! Yikes!

Sunday, June 19, 2011

Great day at the crop!

OMG! Life is just waaaaay too busy, ya know what I mean. Last Sunday { yes! a WHOLE week ago!} I hosted my first ever crop!!! Now here I am a week later FINALLY getting to post something about it!   It might have something to do with the fact that I'm up to my eyeballs getting ready for Chelsea's graduation this coming Wed and Thursday. Between painting a mural { for part of the grad decorating} and trying to get my weed infested garden up to "picture worthy standards" for Chelsea and her peeps...well let's just say that I'm a tad over stretched { and falling off the ladder and busting my knee while up painting the mural has done NOTHING to help me get all this 'stuff' accomplished!} But, again, I am way off track. Back to the crop... there was eleven of us there ( a few less than I had hoped for but not bad for my first crop }. The girls thoroughly enjoyed the make-n-take mini album that I taught them. We made that first, stopped for a quick lunch and then got down to some serious scrapping . And let me tell you, some of those ladies are quick , organized croppers who produced ALOT of beautiful LOs!
Gorgeous work ladies!

The girls had lots of fun, learned a few new things, LOVED all their prizes and new goodies, and are already asking me to organize the next one ! So I guess I can consider it a success! PHEW! I can admit now that I was very nervous ...mostly afraid of not living up to everyone's expectations...but lots of positive feedback makes me feel I did OK.
There were lots of little giveaways during the day . The three door prizes were won by Shirley B{ Texture Boutique and one embossing folder}, Susan B { Graphic 45 Once upon a Springtime kit from Scrapthat! Check out their gorgeous kits here }, and Inez C. won two free tickets for a beautiful cruise around the Bay of Islands that was generously donated by my BFF Tracey of Crystal Waters.
Here's some  pics of the gang!

back l-r Tracy C,Tracey R, Shirley B, SusanB, Lisa H ,JuneE, Ann J,Shirley B
front l-r Yours truly, Inez C
 { missing from photo Catherine R who was a good girl and left to finish studying for her exams!}
I spent a very busy day teaching the mini, helping people with the Cricut and the Cuttlebug ,etc so I didn't get a heck of alot of scrapping done myself but I did manage to finish ONE LO 10 minutes before the crop ended [ literally 10 mins!].

Cute eh?

This is a pic from the early '50s of my Aunt Levinia { she's the littlest one}. I fell in love with these 'Merry January ' pps when I  first spied them. I know they are supposed to be a "winter' paper but as you can see they work just fine for other topics too. I made the flowers in the corner. I KNOW it looks like a jar to the rt side of the pic { as several people have commented on my Scrapbook.com site} but really it's not LOL.
The 'family' square was cut from the accompanying embellie sheet from that paper line and then I cut a journal spot to fit behind it. For some reason I decided to round the corners of both pieces and thus it turned out looking like a jar! LOL. Doesn't help that the ribbon pull tab on the journaling spot is missing from these photos ...oh well!
Thanks so much to Tracey R for pushing  me to do this, providing the venue and donating tickets for a door prize, to Katherine F, my Stampin' Up rep{check her out here} who popped by for moral support,offered lots of advice { plus chopped all those apples for the afternoon snack LOL} and to Kelly {{check out here blog here!} who has pushed me since last winter to get my arse in gear and just do this thing! {plus offered tonnes of advice! } Thanks ladies!

Well ,it's pouring down rain ,yet I have a TON of garden work to do so I guess I'd better get on my rubber boots and rain slicker and get to it! Thanks for dropping by!

Tuesday, June 7, 2011

Get Your Own Piggy!!!!!


Happy June!!! I haven't been scrapping much lately but I did get the chance to whip up this cute Lo of DH and our niece, Laura last week. Rob is a terrible tease and would always chase Laura trying to snitch her stuffed piggy toy. Invariably it would end with Laura yelling " Get your own Piggy Uncle Rob! ". She outwitted him by buying him his very own piggy for his 44 th Bday a couple of years ago! Now he has no excuse ...but I'm sure he'll find other ways to tease her! I luuuuuuv all the new canvas products on the market but of course being just a tad isolated here on our little "Rock" , I can't always get my hands on something the minute I want it...sigh. I did however have tonnes of blank canvas left over from my painting days so I thought I'd play with that and see what I could accomplish. I cut out the individual canvas banner pieces by hand and then I machine stitched around the edges of each piece to halt the fraying. I'm sure you could also paint the edges with a "Fray Check" type of product ...which unfortunately I didn't have on hand at the time. Still and all , I was pleased with the results... Laura's mom { SIL KIM} phoned last night after I sent her a pic and informed me that she loved it and it made her cry! She's a real mushbag just like myself! LOL The cute little pigs were stamped using an older Hero arts stamp I had...seemed appropriate! To see a really amazing tutorial using sticky canvas to make a tree , check out my friend Kelly's blog here at www.kellycreates.blogspot.com You won't be disappointed . It's gorgeous! That's it for today . I'm busy trying to get everything ready for my crop on Sunday ! Only five more sleeps Woohoo!!!!oh ya... and happy sweet sixteenth birthday to my "Baby' Scott ....not such a baby anymore is he? please excuse my dirty kitchen window...I was too busy scrapping ! LOL Toodles!

Wednesday, May 11, 2011

Hope


Well it seems it is the season of Cancer Relay for Life events in a lot of places this month. I was talking to Mom yesterday and she reminded me that her Relay was coming up soon and wouldn't I like to make a donation to her team? Hint hint wink wink...real subtle Mom LOL.Of course I made a donation but it also got me to thinking about a Relay back in 2005 when Mom was asked to be co- patron with Mr. Stoodley for that year's Relay. She was so nervous as she stood to the podium in front of all those people and told "her story". I sat there with tears in my eyes the whole time. So darn proud of her and so grateful that she was a SURVIVOR and could stand up there almost 20 yrs later and inspire others. And my mother is not just a cancer SURVIVOR but a cancer ACTIVIST! Mom has always been a big supporter of many charities but she goes above and beyond for the Cancer Society. She can be found selling daffodils at the stores for the daffodil fundraiser every year; she has particpated as a team member in many Relays for Life: and one of her greatest joys is singing with the CanSurmount choir...a choir made up entirely of cancer survivors. They perform at various charity events, fundraisers and church services throughout the year.And then I realized ...I had NEVER scrapped those photos! GASP!!! Well the time has come. Of course I really wanted to include daffodils on my LO . I couldn't find any pre-made ones so I had to come up with something on my own. I did a quick tutorial to share with you ladies so here goes:

I free hand drew the three petal shape on a post-it note and traced it out two times each for each individual flower.HINT: I just kept flipping the post-it note over each time I taced it with the pencil making my own "carbon/tracingpaper". Cut out these three petal pieces and using a stylus press "lines" into the petals.For the side view flower{ the top flower drapping over the photo} I also hand drew a cup shape cutting it a little wavey across the top . You will also need 5 daisy shapes{ EK Success daisy punch} punched for the front view daffodil and 1 or 2 for the side view daffodil. I then inked the edges of everything with both Barely Banana and then small dabs of Dusty Durango ink both by Stampin" UP.


For the forward facing flower , layer two three petal flower pieces ,turning so that all petals are visable . Glue in place. I used a bamboo skewer at this point to make the petals slightly rounded. I then layered the 5 punched daisy shapes in the center of the daffodil alternating those tiny petals . After the glue sets up { I used a hotglue gun BTW} I used the tip of my craft knife to "fluff" up all the little petals . I also painted the tips of the center with a small amt of Stickles "Star Dust".
With the side view daffodil , you will need to cut out one of the petals from a three petal piece. Using a craft knife cut a rounded slit in the center of the whole three petal piece and slide the cup shape into it. Add the two petal piece behind, turning so that all five petals are showing.Now take the left over petal that you previously cut off and make a small bend along the bottom of it. Refer to above photo. This tab needs to now be tucked into the slit you made for the cup , keeping it on top of the cup piece. Glue all in place . Cut one of the small daisy punched pieces in half and then glue behind the wavey edge of the cup so just a little is poking up behind. Dab with the Star Dust stickles.

The stems were also cut freehand and inked along the egdes to add some dimension. Cut a few skinnier strips with pointy tips and roll tips around bamboo stick to replicate the leaves. I hope you enjoyed this little tutorial. I'd love to see anything you create with these daffodils.send me a link!

Thanks for popping by and please support your local Cancer Relay for Life when it happens in your neck of the woods! Toodles!

Thursday, May 5, 2011

Mini Album for upcoming crop I'm hosting.

I realized today that I haven't posted in FOREVER!!! I've been so busy with work, some inside painting, grad dress shopping,blah,blah,blah. I have done a little scrapping but the last few days I've been busy designing a toilet paper roll mini for my first ever crop that I'm hosting at the Bay of Islands Yachet club on June 12 th! I'm so excited! There's been a huge void left in the scrapping scene here in Corner Brook since our only LSS closed last June and I really miss getting together with other scrappers. So I've taken the bull by the horns so to speak { with only a small amt of pushing form Tracey, Kris, DH Rob and Kelly LOL} and have organized a crop. Hopefully it is just the start ! So I thought I'd share with you the mini I designed to do with the ladies at the crop. I've used all Basic Grey Capella pps for this mini and Stampin' Up "chocolate chip" ink and cardstock. It's the perfect brown for the Capella pps!


Here's a quick tutorial on how I created this mini.
Supplies: spare chipboard sheet , three flattened toilet paper rolls, 12x 12 pp of your choice, crop-a-dile, two eyelets, book rings, ticket corner punch, embellies,ribbon, journaling spots{ I cut mine with Cricut} and ink colour of choice, embossing machine and patterned folder of choice { I used Cuttle bug "Textile"], punches of choice

1. Flatten TP rolls , use bone folder to sharpen the edges { I stored mine under heavy books while collecting}. Don't worry about scraps of paper left on rolls as you'll be covering them anyways. HINT: try to use the same brand of TP so all the rolls are uniform or you may have to trim them.

2.Cut 12 x12 pp into 4 6x6 pieces and then further trim them down to 6x4 3/4 pieces. Keep your trimmed off scraps to make your tags later.

Apply adhesive of choice to center of wrong side of 6x4 3/4 piece of pp and lay flattened TP roll on top. Cut small "v' s to each corner as shown in picture below.This helps to avoid tearing when tucking in your end pieces. Then adhere the pp along length first and then tuck end pieces inside the roll, gluing down all edges as you go.Repeat for other two rolls and set aside.

3: Now let's tackle the covers. Cut two pieces of chipboard 3 x 4.5 inches each. Using a brayer , add ink to the raised side of your embossing folder. Insert chipboard into inked folder and run through your embossing machine. The debossed side will now have ink down in the pattern.Flip over the chipboard and using a sponge /inking tool...gently add ink to the plain embossed side and also ink all edges of the chipboard covers inside and out. Holding the two pieces of chipboard together, punch two holes where you want your book rings to go and then set eyelets in the front cover holes to strenghthen. Proceed to place first TP roll under the front cover lining up the edges on the eyelet end, and use pencil to mark where you need to punch hole and punch with your crop-a-dile. This first TP roll becomes your template to punch the other two rolls. When all are punched, stack together and thread onto the two book rings. Your basic album is now complete. Proceed to decorate with whatever embellies you choose.

4. Now let's whip up those tags for inside your TP rolls. Remember those 6x2 1/2" scraps that were left over at the start? These can now be trimmed down to make tags to fit inside the paper rolls. I left mine sticking out about 1/2" longer than the roll itself. I used a Stampin" up ticket corner punch on the two outside corners of the tag and a hole punch on the center of the outside edge and thread a little ribbon through it to make it easier to pull out of the rolls. Add quotes, small pics or whatever you choose to your tags. And that's it!!
As you can see from the first pictures , I entitled mine "Time Flies" and I used all the wallet size photos of my DD Chelsea from Kindergarten to Grade 12.I can't believe she's graduating next month! This mini album would also be nice as an inspiration book filled with your fav quotes or Bible verses, a grandma's brag book etc. The sky's the limit! Thanks for popping by and an early Happy Mother's Day to all my mom friends out there! HUGS!